Showing posts with label Cooking. Show all posts

Thursday, 24 April 2014

Blueberry Muffin Oatmeal

IMG_0791editedtitle

Oatmeal is my go to breakfast. I eat oatmeal for breakfast probably about 90% of the time because not only is it extremely nutritious but is also customizable to your liking.

IMG_0789edited

This creation of mine is what I like to call a Blueberry Muffin Oatmeal as it reminded of a blueberry muffin. It was sweet and warm with the right amount of blueberries mixed in and allowed me to feel like I was enjoying a treat for breakfast while I was actually eating healthy! I hope you guys enjoy this creation of mine.

IMG_0790edited

Ingredients:

1/3 cup oatmeal

1 cup water

approx. 1/3 cup blueberries

approx. 1/3 cup almond milk

1/2 tsp. butter extract or real butter if you prefer

1 tsp. all natural maple syrup

1 tsp. coconut sugar

1. Cook oatmeal by adding 1/3 oats to 1 cup water. Cook in a sauce pan for 5-7 minutes or until ready.

2. Add oatmeal to a dish and combine blueberries, almond milk, butter extract, maple syrup and coconut sugar, stir and enjoy!

Tuesday, 22 April 2014

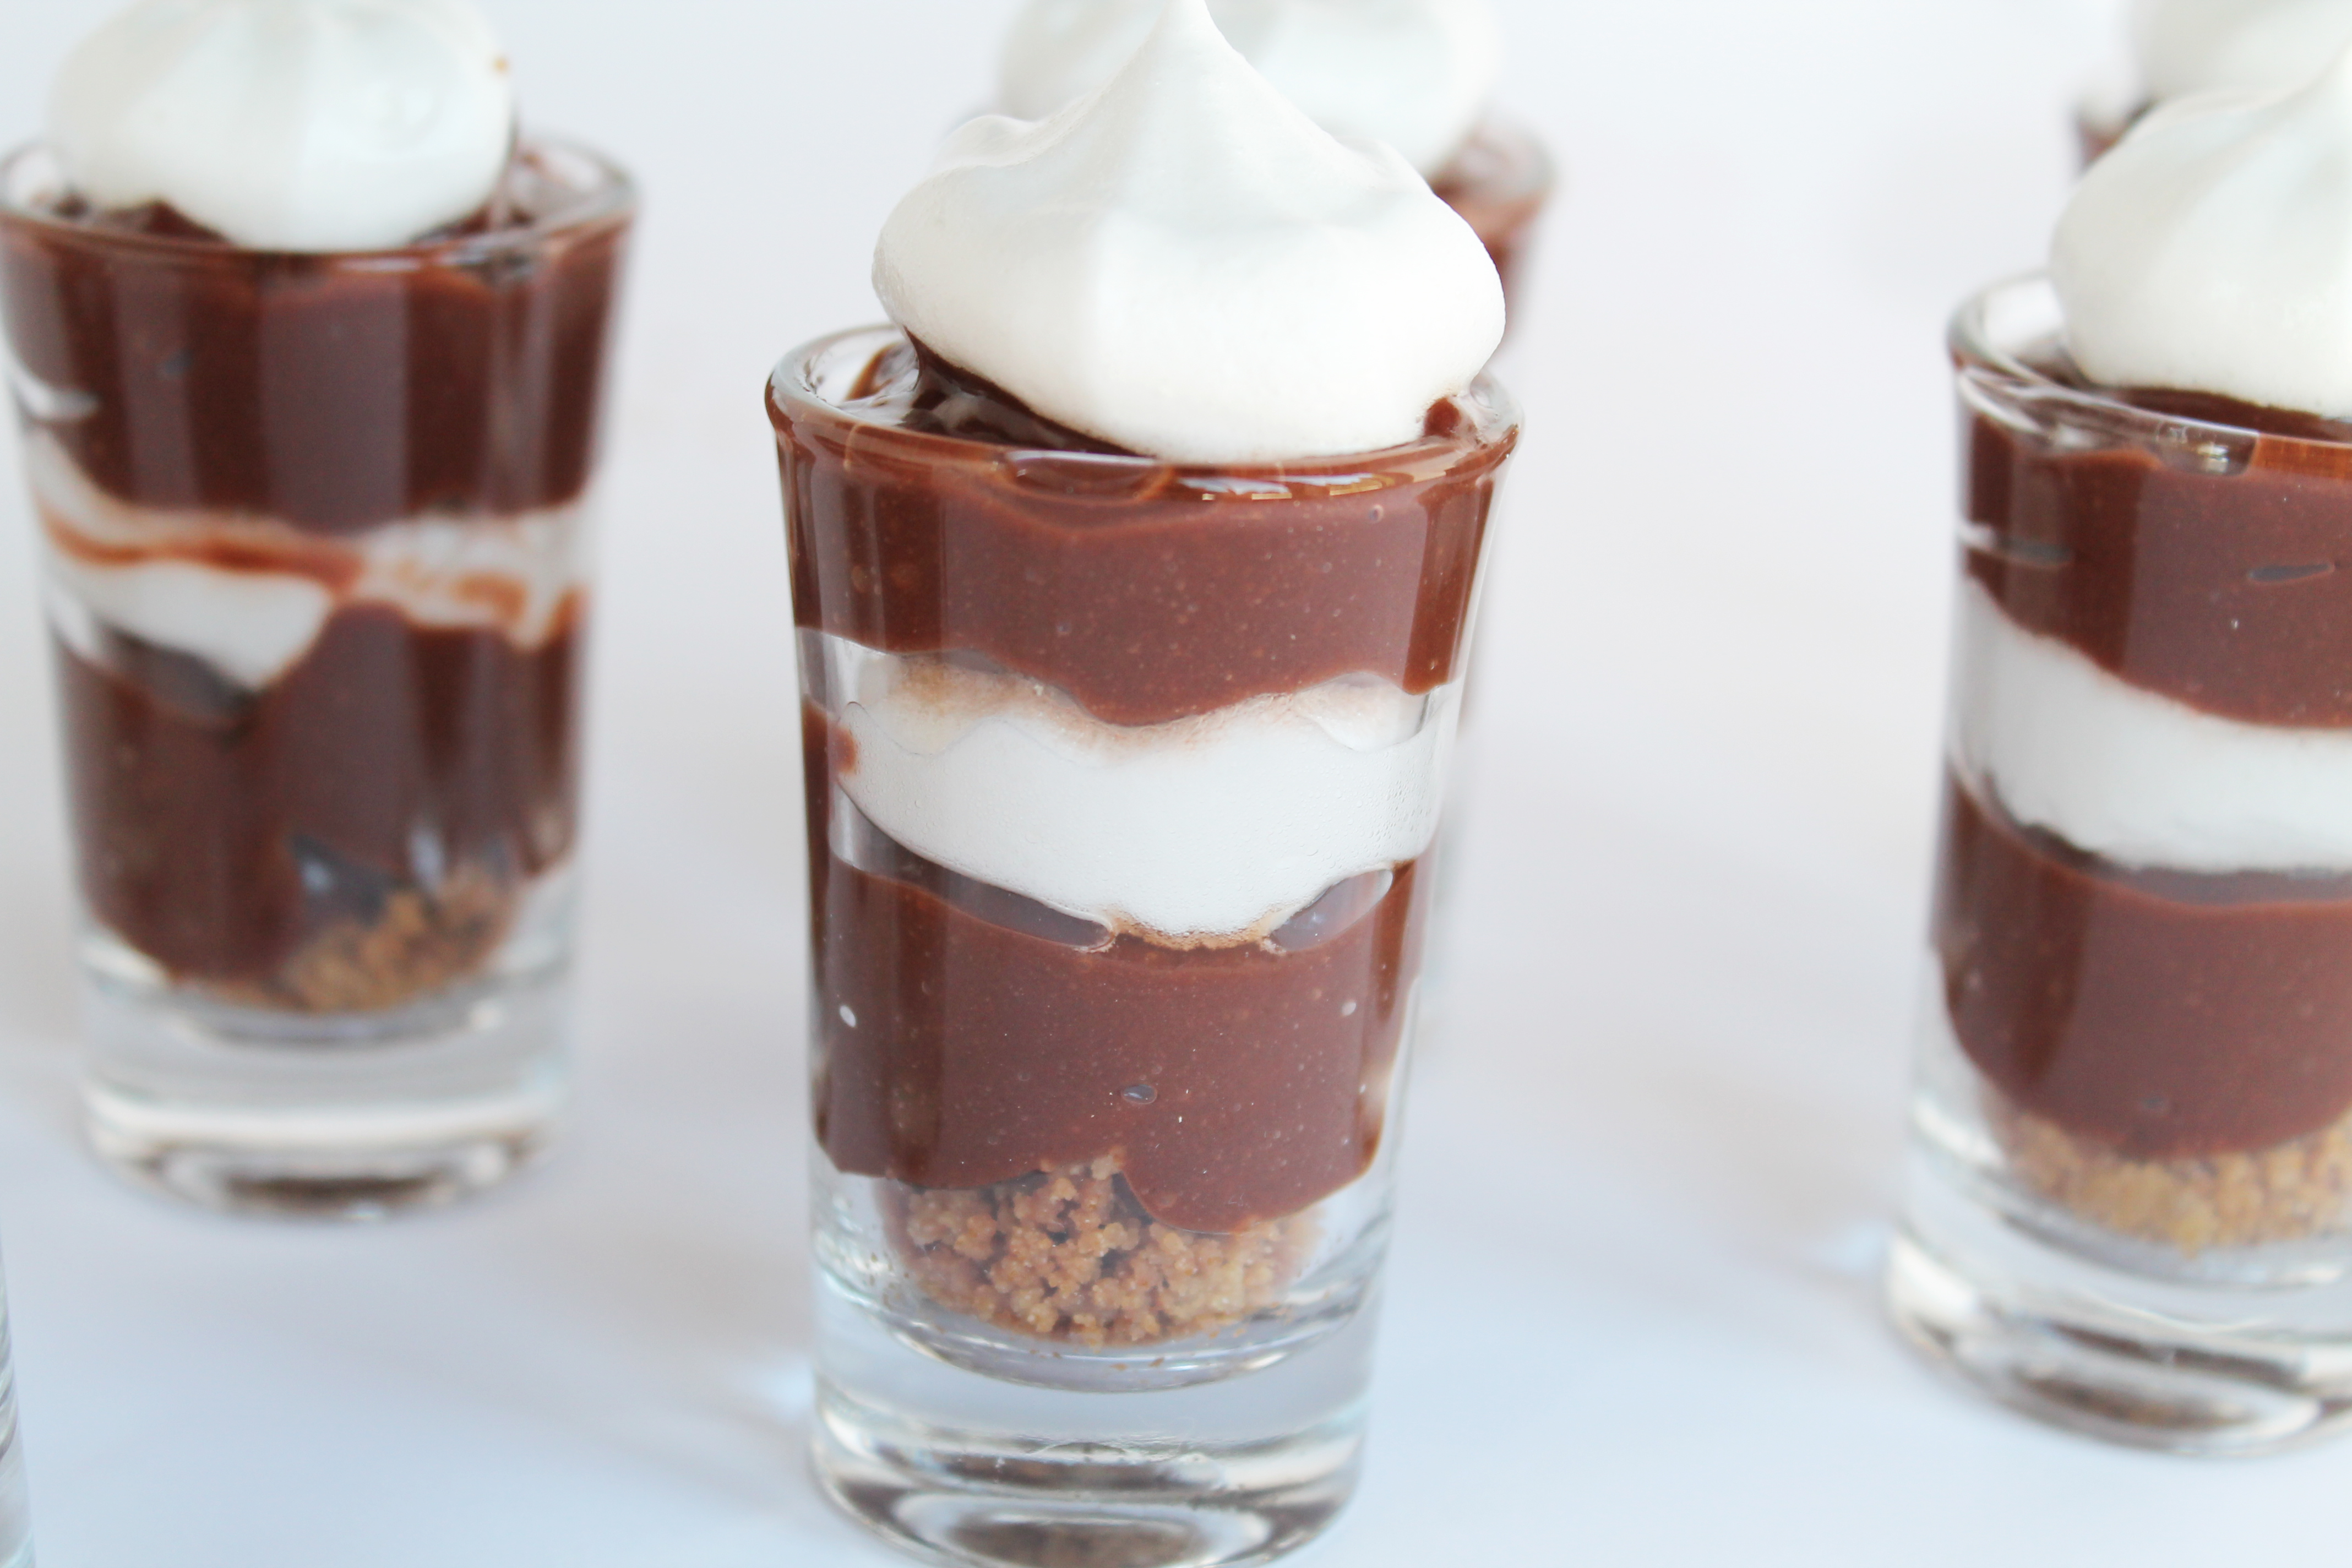
Dessert Shots: S'mores & Vanilla Rainbow

IMG_0703editedtitle

I had a great Easter this year and I hope you all did too. I woke and went to the gym with my to get some exercise in before all the craziness began. Once we got home the cooking and baking started and we didn't finish until dinner was served... a full day of being in the kitchen gets tiring but is worth it in the end. My whole family came over for dinner and an Easter egg hunt so the was filled with family, food and chocolate.

IMG_0708editededitedtitle

To compliment the delicious Easter dinner my mom made I created a few desserts and this is the first of three.

IMG_0704edited

These dessert shots are great for kids (adults too) and fun to create! They aren't healthy but, they are gluten free and the kids really loved them so thats all that matters.

IMG_0711edited


The first flavour I made were a S'more inspired shot and the second was a simple Vanilla Rainbow shot... these desserts were a hit! Not only were they well liked but they were inexpensive and I was able to use the same marshmallow fluff for both shots.

IMG_0706edited


Ingredients: S'mores shot

1 package gluten free graham

1/3 cup butter

1 package chocolate pudding

4 egg whites

1/2 cup sugar

1 tsp. vanilla

1. Preheat oven to 350 F. Combine graham and butter, bake for 10 minutes

2. Make chocolate pudding using instructions on the package. Make the "marshmallow fluff". Place all 4 eggs whites in a mixer, mix for approx. 5 minutes then slowly add sugar and vanilla. Beat until stiff peaks form.

3. Assemble your dessert shots starting with a layer of graham, followed by a layer of chocolate pudding, marshmallow fluff, chocolate pudding then top with a final layer of marshmallow. Allow to set in the fridge.

Ingredients: Vanilla Rainbow Shot

1 package vanilla pudding

food colouring ( red, blue & green)

gluten free chocolate candies

left over marshmallow fluff

1. Prepare vanilla pudding according to package instructions.

2. Separate pudding into three bowls, add red food colouring to one bowl, green to the other and blue to the final bowl. Mix colour into the pudding.

3. Assemble dessert shots by placing a layer of green pudding, followed by a layer of candies, pink pudding followed by a layer of candies, blue pudding and top with marshmallow fluff. Allow to set in the fridge.


Thursday, 27 March 2014

Skinny Brownie Cookies

IMG_0592title

I'm not gonna lie to you, for me making these cookies was a struggles due to the amount of times I had to taste them. It's not that they tasted bad but I am really not a fan of chocolate, so having to taste chocolate batter over and over again was actually a struggle for me. But, thankfully I only had to do one round because thats all it took for these cookies to turn out like I imagined!

IMG_0581edited

These are a spin on a typical brownie cookie minus all the sugar and butter. My version is both gluten free and refined sugar free leaving you with nothing to feel guilty about!

IMG_0588edited

Even the chocolate I used was refined sugar free. I was walking through my bulk food store when I came upon a wonder product. It was an all natural chocolate, sugar free and sweetened with stevia! I was so excited to find this product and this is what inspired me to make a healthy chocolate brownie cookie for all you chocolate lovers out there.

IMG_0593edited

Try it out and let me know what you think of what I like to call a Skinny Brownie Cookie!

Ingredients:

1/4 cup coconut oil

1/8 cup melting chocolate (I used a no sugar added sweetened with stevia chocolate but a semi sweet melting chocolate works well too)

1 egg

2-3 tbsp. stevia

1 tbsp. maple syrup

1/2 tsp. vanilla

1/4 cup or 50 g teff flour

1. Preheat oven to 350 F. Place coconut oil and chocolate in a pot. Melt on medium heat stirring often.

2. While chocolate is melting combine egg, stevia, vanilla and maple syrup. Add melted chocolate.

3.  Add teff flour to the mixture and mix well. Cover a cookie sheet with parchment paper, scoop a heaping tablespoon of cookie batter onto cookie sheet and do that until all batter is gone. Bake for 5-6 minutes and enjoy!

Monday, 3 March 2014

Gluten Free Quinoa Flour Ravioli with a spinach ricotta filling

Image


Pasta is definitely one of my favourite foods. There are so many different varieties and the flavour combinations are endless!

Image


For dinner this Sunday night my mom and I decided it would be fun to create our own ravioli! To add an extract challenge to the task we made them gluten free and as healthy as possible. Let me tell you they turned out great!

Image


Using only four simple ingredients I created these gluten free quinoa flour ravioli and stuffed them with a mixture of sauteed spinach and ricotta cheese. I'm so excited to make these again and create plenty of different filling options... I'v already brain stormed a bunch!

Image


This is a great Sunday night meal to make with your family and enjoy your time together.

Ingredients:

2 cups quinoa flour

2 eggs + 1 egg ( to be used to seal pasta)

1/2 cup water

2 tsp. olive oil

* To create filling I just sauteed some spinach with salt and pepper then mixed it with ricotta cheese.

1. Place 2 cups quinoa flour on your counter, shape into a hill and create a well in the middle.

2. Add 2 eggs to the centre of the well and gently incorporate them into the flour using two fingers. Once eggs are incorporated add 1/2 cup water.

3. Kneed dough together and add 2tsp. olive oil.

4. Wrap dough in plastic wrap and allow it to sit for 30 minutes.

5. Using either a rolling pin or a pasta machine roll dough until it is paper thin. Using a cookie cutter cut dough into circles.

6. Place 1 egg in a bowl beat with fork to create an egg wash. Rub egg wash on pasta dough, stuff with your choice of filling and place a second piece of dough on top, press down edges with fingers then seal with a fork.

7. Place pasta in boiling water for 3-5 minutes and serve with your choice of sauce.

Saturday, 18 January 2014

Skinny Mini Oatmeal Cookies

IMG_0135edited


The other day I made these Skinny Mini Oatmeal Cookies ( as I like to call them) and they were a hit! I made them at about 1 o'clock in the afternoon and they were gone by 8 o'clock that evening. They tasted just like a regular oatmeal cookie yet they were made gluten free and without refined sugars or extra fat.

 IMG_0126edited


They are a cookie everyone will love, even those who are not healthy eaters because you can't even tell they were made with healthy ingredients! This is my favourite healthy cookie recipe I have made to date and am already planning on making them again this weekend.

IMG_0122edited


IMG_0134edited


Ingredients:

1/2 cup almond flour

3 tbsp. oat flour

3 tbsp. coconut oil

1/2 tsp. cinnamon

1/4 tsp. baking soda

1 tsp. vanilla

2 tbsp. maple syrup + 1/2 tbsp. stevia

pinch of salt

2 tbsp. oatmeal

1. Preheat oven to 350F.

2. Combine ingredients in a bowl, line a baking sheet with parchment paper and roll out your cookies into mini balls ( about the size of a nickel).

IMG_0118edited


3. Bake for 6-7 minutes, allow to cool then enjoy! I ate mine with a little bit of coconut milk and it was an excellent sweet treat.
IMG_0130edited


Tuesday, 7 January 2014

Skinny Apple Crisp

Image

This weekend I chose to make an apple crisp for Sunday nights dessert. But of course I wanted to come up with a healthy version of this popular treat so there would be no guilt in eating it. I like to call my version of apple crisp a skinny apple crisp, as it is free of butter, and any sort of refined sugar, It is also gluten free and vegan so a wide range of people are free to enjoy it! The ingredients used are all ones you should be able to find in your pantry, I hope you enjoy this healthy dessert. 

Ingredients: 

6 large apples

2 tsp. cinnamon 

1 tsp. nutmeg

3 tbsp. honey + 3 tbsp. natural maple syrup 

1 1/3 cups gluten free oats

2/3 cups almond flour 

1 tsp. baking soda

 1tsp. baking powder

pinch of salt

4 tbsp. melted coconut oil 

Image

1. Preheat oven to 350F. Combine apples, cinnamon, nutmeg, 1 tbsp. honey and 1 tbsp. maple syrup in a bowl, mix well. Place apple mixture into a 8x 11inch baking pan and bake for 10 minutes. 

Image

2. While the apples are baking combine remaining 2 tbsp. honey, 2 tbsp. maple syrup, oats, almond flour, baking soda, baking powder, salt, and  coconut oil in a bowl. After 10 minutes take the apples out of the oven, place oat mixture on top ad baking for another 15-20 minutes ( until top is golden brown). 

Image

Monday, 18 November 2013

Cranberry Walnut Cheesecake

Image

This is my dessert creation I made for this Sundays dinner. It is a gluten free Cranberry Walnut Cheesecake that incorporates an abundance of clean eating ingredients. This is my personal favourite clean cheesecake recipe I have came up with this far and will enjoy it many more times playing around with different topping variations. I think it was also a family favourite because the whole cheesecake went by the end of the evening, so enjoy!

What You'll Need:

Crust: 

1 cup dates

2 cups walnuts

Filling: 

1 cup raw cashews

250g container light cream cheese

2 tbsp. water

sweetener, to taste ( I used 2 tbsp. honey and about 1.5 tbsp. stevia)

Topping:

3/4 cup dried cranberries

2 tbsp. water

1 tbsp. honey

2 tbsp. melted coconut oil

1. First create your crust. Do this by combining dates and walnuts in a food processor until a crumble like texture forms. Press this mixture into a spring form pan and place to the side while you make the filling and topping.

2. Next it is time to make the filling. Put raw cashews and water in food processor and blend for about 5 mins. Then add your cream cheese and sweetener of choice and blend until smooth. Place this filling evenly on top of your crust.

3. Lastly create your topping. Combine cranberries, water, honey and coconut oil in your food processor and blend until desired texture is reached ( I wanted mine slightly chunky so I didn't blend mind too long but if your want it smooth blend it until it reaches that texture). 

4. Place your topping on top of your cheesecake and place the whole thing in the fridge for a couple hours to set.